


Last Updated: November 5, 2026
Quick Summary
A clutter-free desk is a workspace where every item on the surface earns its place and everything else has a home out of sight. Build one by clearing the surface, sorting items into keep, toss, and store piles, then grouping daily items into task zones. The setup takes an afternoon and maintenance takes five minutes a day.
- Remove everything from the desktop, wipe the surface, and put back only what you used in the last week.
- Sort every item into three piles: keep for daily items, toss for broken things, store for weekly or less.
- Build task zones around your work pattern: laptop-only, paper-heavy, or multi-monitor layouts.
- Without drawers, use vertical storage, a desktop file holder, and a lidded floor box.
- Route charging cables along the back edge and use one multi-device charger instead of three bricks.
Table of Contents
- Why a Clutter-Free Desk Changes How You Work
- Step 1: Clear the Desk Surface and Start With a Clean Slate
- Step 2: Sort Every Item Into Keep, Toss, or Store
- Step 3: Build Task Zones and Group Similar Items
- How to Organize a Desk Without Drawers
- Home Office Desk Organization Ideas That Fit Small Spaces
- Choosing a Desk Organizer and Desk Organization Tray That Work
- Build Your Clutter-Free Desk Setup at MixVanta
- Frequently Asked Questions
Why a Clutter-Free Desk Changes How You Work
A clutter-free desk is a workspace where every item on the surface earns its place, and everything else has a home out of sight. That single standard changes how you work. Fewer objects in view mean fewer small decisions pulling at your attention between tasks.
Remote work makes this harder, not easier. Your desk sits in your home, so mail, kids' school papers, and half-finished projects drift onto it. Many remote workers find that the desk slowly becomes a storage shelf rather than a work surface.
The fix is a system, not a weekend purge. Once your workspace is tidy, you can keep your devices running smoothly with these tips for maintaining cheap tech. Below, we walk through five steps you can repeat in under half an hour. We also cover small spaces, desks with no drawers, and how to keep the surface clear once it is.
Step 1: Clear the Desk Surface and Start With a Clean Slate
Start by removing everything from the desktop. Every item, down to the pen cup. Wipe the surface, then put back only what you used in the last week.
This clean slate does two things. It shows you how much you actually own, and it resets your default.
While the surface is bare, deal with the charging mess. A single charging station for your phone, watch, and earbuds removes several cables at once. Our 3-in-1 foldable wireless charger folds flat and charges three devices from one spot, which clears the tangle that usually collects at the back corner of a desk.

Watch out: do not skip the wipe-down. Dust and crumbs collect under monitor stands and keyboard risers, and once items go back, that layer stays for months.
Step 2: Sort Every Item Into Keep, Toss, or Store
Sorting is the step most people rush, and it is the one that decides whether the desk stays clear. Set out three piles: keep, toss, and store.
- Keep: items you touch daily. Pen, notebook, headset, mouse.
- Toss: dead pens, old receipts, cracked cables, anything broken.
- Store: everything used weekly or less. Reference papers, spare supplies, chargers for other devices.
Be strict about the keep pile. If you cannot remember using an item this week, it goes to store. You are not throwing it away, which makes the decision easier.
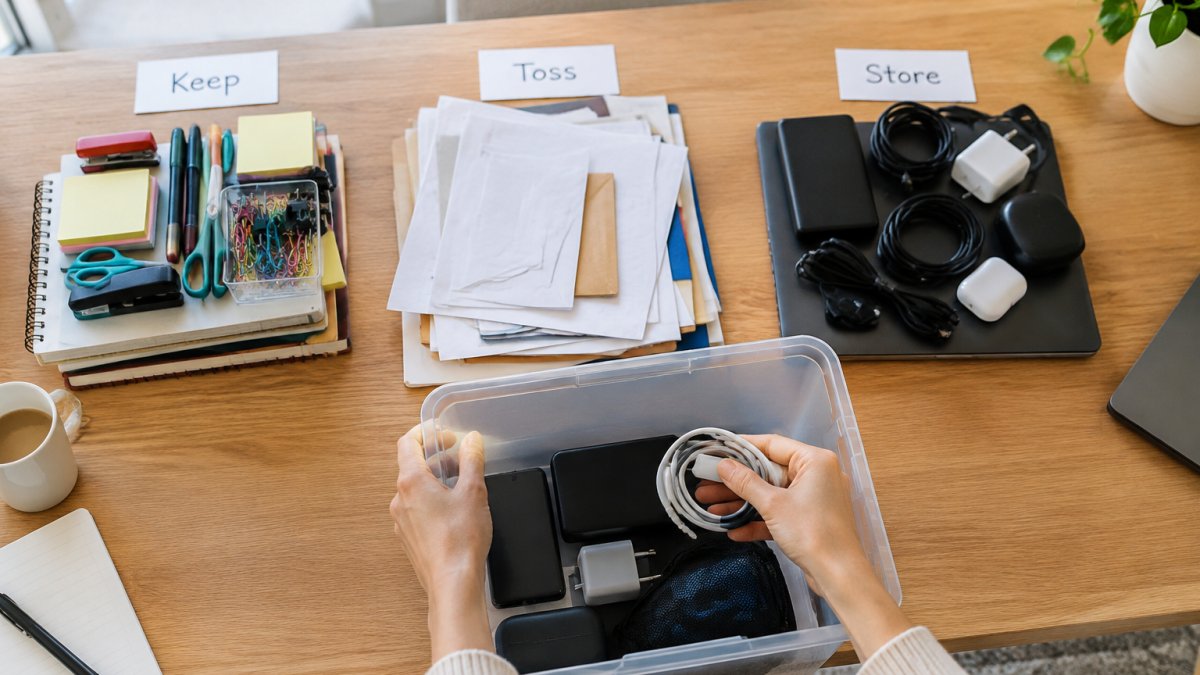
A common mistake is keeping a "maybe" pile. It becomes the new clutter within days. Force every item into one of the three piles and move on.
Step 3: Build Task Zones and Group Similar Items
Task zones are areas of the desk assigned to one kind of work, and they are the difference between a desk that stays clear and one that drifts back into clutter within a week. A zone works because your hand learns the layout: after a few days you reach for the headset or the notebook without looking, and you stop leaving items in random spots because every item has an assigned home.
Start by mapping your actual workday, not an idealized one. Most remote workers run one of three patterns, and each needs a different zone layout:
- Laptop-only: one primary zone for the laptop and mouse, one narrow charging zone at the back edge, and one small tray for items in transit. Keep the footprint under about two feet of desk width so the surface never has room to accumulate.
- Paper-heavy: a writing zone with notebook and pen, a filing zone with an expanding file or letter tray, and a staging zone for documents that are mid-process. The staging zone is the one people skip, and it is the one that keeps loose paper from spreading across the whole desk.
- Multi-monitor: a screen zone along the back edge, a keyboard-and-mouse zone in front of it, and a charging zone off to the dominant-hand side. With two screens, the space beneath the monitors becomes prime storage, so plan for a riser or stand before you place anything else.
Group similar items inside each zone so the grouping reinforces the habit. Pens with pens, cables with cables, paper with paper. When two categories share a zone, one of them slowly takes over.
Paper is where zones usually break down. Loose documents spread across the whole surface because they have no assigned spot. A simple expanding file fixes this. The rainbow 7-pocket expanding file sorts letter-size paperwork into separate pockets with an elastic closure, so loose documents have a place to go.

Label each pocket or zone. Labels sound trivial until you try to find a document in an unlabeled stack. A strip of masking tape and a marker is enough to start; upgrade to printed labels once the layout settles.
Watch out: do not build zones around items you plan to buy later. Build them around what is on the desk today, then adjust when new equipment arrives, or the zones will never match how you actually work.
Here is how each remote work pattern maps to a zone layout.
| Work pattern | Zones to build | Key detail |
|---|---|---|
| Laptop-only | Primary laptop zone, narrow charging zone, small tray | Keep footprint under about two feet of desk width |
| Paper-heavy | Writing zone, filing zone, staging zone | Staging zone keeps loose paper from spreading |
| Multi-monitor | Screen zone, keyboard-and-mouse zone, charging zone | Space beneath monitors becomes prime storage |
How to Organize a Desk Without Drawers
A desk without drawers still works. You replace hidden storage with vertical storage and containers that sit on or beside the desk.
32-Inch Dual-Screen Monitor Stand →
Here is how we would set it up:
- Add a small shelf or riser under the monitor to create storage space above the surface.
- Use a desktop file holder for active paperwork.
- Hang a small bin or hook on the desk side for cables and chargers.
- Put a lidded box on the floor beside the desk for weekly-use items.
- Keep one shallow tray for items in transit, like mail or a phone.
The rule stays the same: daily items stay visible, everything else leaves the surface. Without drawers, you have to be stricter, because there is nowhere to hide a growing pile.
Home Office Desk Organization Ideas That Fit Small Spaces
Small desks fail when storage climbs onto the work surface. Keep the footprint tight and push storage upward or sideways.
- Mount a shelf above the monitor for books and bins.
- Use a monitor stand with built-in storage underneath.
- Choose a narrow tray instead of a full desk organizer.
- Keep one small decorative piece only, so the desk still feels like yours.
- Store seasonal or bulk supplies outside the room entirely.
A small bookshelf ornament adds personality without eating usable space, and it gives the eye one calm focal point instead of twenty.
Shared homes add a wrinkle. If the desk sits in a living area, use a lidded box so the workspace can be packed away at the end of the day. The desk returns to being a table, and your work stays out of the family's way.
Choosing a Desk Organizer and Desk Organization Tray That Work
The right desk organizer matches your items, not the other way around. Measure your desk depth first, then buy. A tray that leaves no room for the keyboard forces the keyboard forward and pushes everything else toward the edge, which is how desks start to feel crowded even after a declutter.
Use this checklist before you buy:
- Does the tray fit your desk depth with room for the keyboard?
- Are the compartments sized for what you actually own?
- Can you reach every compartment from your chair?
- Does it have a home for cables, not just pens?
- Will it still work if you add one more device?
A desk organization tray works best for small, loose items: pens, clips, earbuds, a watch. Anything larger needs a different home. Trays fail when people use them as catch-alls, and a full tray looks worse than no tray.
Most buying guides stop at the tray. The bigger source of visual clutter on a remote desk is the cable and charger layer, and it needs its own plan. Route charging cables along the back edge of the desk and anchor them with clips so they do not slide forward.
Digital clutter belongs in the same system. Treat your desktop the way you treat the physical surface: a short list of active files, everything else in labeled folders, and notifications silenced during focus blocks.
Ergonomics decide where storage can sit without forcing you to twist. Keep frequently used items within reach of your dominant hand, and leave the far corners for things you touch once a day.
Monitor placement is part of organization, not a separate topic. The 32-inch dual-screen monitor stand holds two screens from 13 to 32 inches, offers 360° rotation, and lifts them off the desk to free up surface space.

Watch out: do not buy a large organizer to compensate for owning too much. If the checklist fails on compartment size, the answer is to sort and store more items, not to buy a bigger tray.
Build Your Clutter-Free Desk Setup at MixVanta
Keeping a desk clear is a weekly habit, not a one-time project. The setup takes an afternoon. The maintenance takes five minutes a day.
At MixVanta, we stock the pieces that make the system work: charging stations that reduce cable clutter, expanding files that give paper a home, and monitor stands that free the surface underneath. We offer a 30-day money-back guarantee, free shipping over $70, and fast handling.
Start with one zone this week. Get started with MixVanta and build a desk setup you can actually keep clear.
Frequently Asked Questions
What is the 5-5-5 rule for decluttering a desk?
The 5-5-5 rule is a quick sorting method: pick five items to throw away, five to donate or relocate, and five to put back in their proper place. On a desk, that means five scraps of paper in the recycling, five duplicates or unused gadgets moved out, and five everyday tools returned to a tray or drawer. It takes about ten minutes and works well as a weekly reset when a clutter-free desk starts slipping.
How do I organize a desk without drawers?
Use vertical and portable storage instead of built-in drawers. A desktop organizer with slots holds pens, chargers, and notebooks upright, while a small desk organization tray corrals keys, earbuds, and receipts. Stack letter-size document folders or a 7-pocket expanding file for paperwork, and add a monitor stand with space underneath for a keyboard. Keep only frequently used items within reach and store the rest in a bin on a shelf.
What should I keep on my desk for remote work?
Keep only what you touch during a normal workday: laptop or monitor, keyboard, mouse, headset, one notebook, a pen, and your charging setup. Everything else, including backup cables, spare pens, and old paperwork, belongs in a drawer, bin, or file. A clean desk surface with essential items within reach reduces visual distraction and makes your daily reset faster.
How can I keep my desk tidy throughout the workday?
End each day with a two-minute reset: return tools to their zones, file loose paper, wipe the surface, and plug devices into one charging station. Once a week, do a longer pass with the 5-5-5 rule and clear digital clutter by sorting desktop files into labeled folders. A repeatable routine keeps a clutter-free desk from sliding back into a pile of supplies and paperwork.


